Unsubscribe from your list / Opt-In and Opt-Out |
  
|
Unsubscribe from your list / Opt-In and Opt-Out |
|
Opt-In or Opt-Out in Mass Mailing News... What does that mean? If you do want to receive newsletters, you'll opt in to receive additional information. If you would prefer not to receive information by email, you'll opt out from subscribing.
To manage your subscriptions, unsubscriptions and returned emails through a module, follow the indications below. The principle is the same for subscription and for unsubscriptions.
Set subscriptions and unsubscriptions in Mass Mailing News
You can receive subscriptions and unsubscription emails through this module. To receive the emails, the software offers many possibilities (ex.: you can receive the subscriptions and the unsubscriptions where the subject is equal or contains “Subscription” or “Unsubscription”.
First, make sure to have all the proper information concerning your server
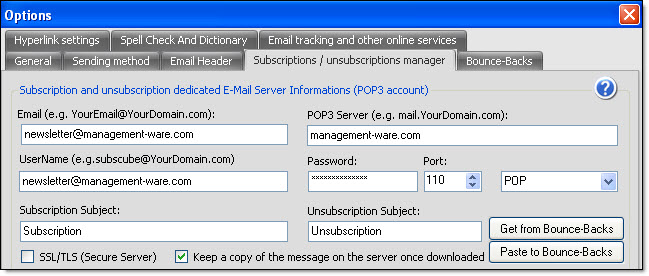
Subscriptions and unsubscriptions…what information do you need to put in the fields?
1.To get the Subscriptions and unsubscriptions Manager tab, go to “View” menu and select “Options”. After that, click “Subscriptions and unsubscriptions Manager” tab.
2.In the “Email” field, you need to enter an email address. Ex.: newsletter@management-ware.com.
3.In the “POP3 Server” field, you need to enter the server’s address for incoming messages. Ex.: yourDomain.com or mail.yourDomain.com.
4.In the “Username” field, you need to enter an email address which will receive the subscriptions and unsubscriptions. In the “Password” field you need to enter the password corresponding to this email address. Ex.: newsletter@management-ware.com.
5.In the “Port” field, indicate your port.
6.In the “Subscription subject” field, enter a subject. Ex.: subscription
7.In the “Unsubscription subject” field, enter a subject: Ex.: unsubscription
8.After entering the information in the fields correctly copy the html code from the edit box, located in the lower part of the dialog box, and paste it in one or more pages of your website (see the image below). You only have to copy the text that is between brackets.
9.If you use a secure server, you need to check the “SSL/TLS (secure server)” box. server once downloaded”.
10.In the “Automatic subscription options” and “Automatic Unsubscription options” select your preferences.

11.Finally, click on the “Ok” button to close the dialog box and to save the data.
To copy information from the returned emails, click on the “Get from Bounce-backs” button. This option will prevent you from manually reentering the information that has already been entered.
To paste information in the returned emails section, click on the “Paste to Bounce-backs” button. This option will prevent you from manually reentering the information that has already been entered.
To cancel, you just need to click on the “Cancel” button. If you click on “Cancel”, your data will not be saved.
If you click on the “Default” button, the program will reset the program settings to zero. Therefore, you will lose all your data and you will need to reenter the information. After you click on the “Default” button, you will need to confirm you choice. If you click on the “Yes” button, you will not be able to retrieve your data.
Note: It is recommended to create an email that will be used exclusively for mailing the newsletter (ex.: newsletter@mydomaine.com). We also recommend using the same email for subscriptions and unsubscriptions (removal from the mailing list). Just ask people to enter “Subscription” or “Unsubscription” in the subject field of the email.